The 8 Essential Steps To Clawhammer Series
This series of lessons, presented in the video playlist below, will equip you with the essential skills of clawhammer banjo that you will utilize throughout the remainder of the Breakthrough Banjo course.
You’ll find the video transcript and tabs of the exercises below each of the videos (and you can also download the entire 8 Steps book by clicking here).
Playlist
Step 1: The Basic Motion
Welcome to the first lesson in the “8 Essential Steps to Clawhammer Banjo” lesson series. In this first installment, I’m going to be covering what is the distinguishing feature of this style of playing, which is the movement of the picking hand. For most of you, this is going to be your right hand.
I’m covering this first not just because it’s what imparts this style with its defining sound, but also because it’s the thing that oftentimes leads to the most frustration for folks who are trying to learn it. This is not because the motion is particularly difficult, but rather because folks get the wrong impression or idea about what it should be.
So I want to make sure that you end up getting started off on the right foot, that you don’t end up developing a technique that will make it difficult for you to progress or that will be really hard to unlearn later.
The Shape of the Picking Hand
In some respects, everything that you need to know about the right hand, or the picking hand, in clawhammer banjo is in the name itself. You basically put your hand into a claw-like shape, and then you hammer down on the strings.
Now, if you’ve ever played a stringed instrument before, or even if you haven’t, this may seem like an odd approach to playing. It’s our natural inclination, particularly when we’re trying to strike individual strings, to try to do so by plucking up with our fingers. This makes sense because we’re able to make very precise movements with our fingers.
Fortunately, many years ago, probably in the continent of Africa, some brave and ingenious soul, who was likely playing a banjo-like instrument, decided that he or she would instead try to strike the individual strings not by picking upwards, but by striking down with the back of their nail towards the ground.
And surely this felt awkward at first, as it will feel to you, but over time that person must’ve realized that you could teach yourself to become just as accurate at hitting individual strings with the downpicking motion as you can by up picking. And, better yet, what they also probably realized was that using this technique opened up a world of musical, and particularly rhythmic, possibility that you just can’t get using the up picking method.
So the first thing that I want you to do is start to get comfortable just with the shape that your hand should be in when you’re playing clawhammer. And here there are two points that I want you to remember, or to think about.
One is that the hand should be very relaxed. Muscle tension in general is the enemy of music, and muscle tension in the hand with clawhammer banjo is going to lead to a lot of pain and frustration. So the first thing is to make sure your hand is nice and relaxed.
I think some people get the idea that the strings are set in motion by keeping a very rigid hand through the striking motion. Yet, the reality is the strings are set in motion not from a rigid hand, but from the momentum of the hand that’s generated by the movement at the wrist. In essence here the striking finger is really just along for the ride as it moves through the string.
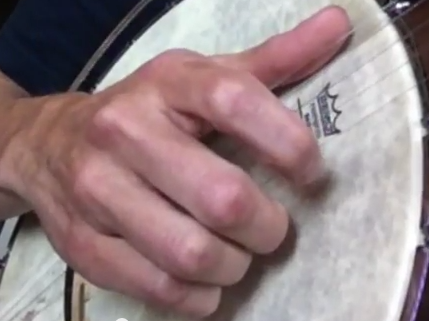
Now you’ll notice when I play my index finger actually sticks out a little bit. I’m actually striking the strings with my middle finger, so my index finger really isn’t doing anything. But the reason it’s out there is because that’s simply the most relaxed position for my hand.
If I were to try to bring it into a more claw-like posture, it would introduce tension into my hand, and I don’t want muscle tension. So the point here is not that you should stick out your index finger like I do, but that you should be mindful of how your hand feels, and mindful of the position where it feels the most relaxed.
The Hammer and the Strum
In clawhammer banjo, almost all of the movement you’ll be making is going be at the wrist. And you can think of the wrist as having two primary degrees of freedom. You can either move it side to side, as you would if you’re shaking off some water from your fingers, or you can also move it up and down, as you would when you’re knocking on a door.
Most of time, the movement you’ll be making is the hammering motion, or the up and down movement of the hand like you’re knocking on a door. Sometimes, clawhammer is also referred to as “knocking banjo”, or “rapping banjo”, for this reason. And the hammering motion is the motion you’ll be using to strike individual strings.
If you’re strumming across multiple strings — a technique many players use in their playing — then you’ll be moving your wrist in the side to side motion.
Now, the question that inevitably arises at this point is: “what finger should I use to strike the strings with?” And here there are really two viable options.
You can use your index finger, or you can use your middle finger. And, generally speaking, clawhammer banjo players are divided equally in these camps. So about fifty percent use the index finger, about fifty percent use the middle finger, and about two percent use another appendage.
Personally, I use my middle finger, just because that’s what I find more comfortable. And what I’d recommend you do when you’re first starting out is just experiment with using the middle or the index finger, and if one feels more comfortable than the other, just go with that. If they feel equally comfortable, or equally awkward, which is more likely, then maybe just choose your fate with a coin toss.
Two Exercises
I’m gonna leave you with two exercises that I want you to get comfortable with before you move on to the next lesson. And the purpose of these two exercises is to allow you to get familiar with the two basic motions. So the first one we’ll start with is the hammer motion.
All I want you to do for the first exercise is just practice the hammer motion on the first string.
The first string is the one that’s closest to the floor, the fifth is the one closest to you. Just practice striking down in a hammering motion on the first string.
Don’t worry here about being accurate. If you don’t just strike the first string, if you hit others, it doesn’t matter. If you miss, it doesn’t matter. Just practice getting the basic idea of the hammering motion down.
One of the things I want you to experiment with as you do this is how much force, or how little force, it actually takes to get a sound out of the string. You’ll probably be surprised at how little effort you have to exert to actually make a sound. And if you can start out with a light touch from the beginning, then it’ll make your life a lot easier down the road with this style.
The second exercise that I want you do is to just practice the strumming technique with the hand, which is the side to side movement. Again, don’t worry too much about accuracy here, whether or not you hit two, or three, or four strings when you strum. I just want you to get the basic side to side motion down as you strike the strings.
So those are the two exercises I want you to practice, the hammer and the strum, until you feel comfortable with them. I think that any time you’re learning a totally new technique or skill, that about fifteen to twenty minutes a day of dedicated and focused practice on it is really all you need to make progress. Do that, and then once you feel like you’ve got it down, you’ve got it under your belt, then you’ll be ready to move on to the second video.
Key Points from Video One
- The motion picking hand is the defining feature of clawhammer banjo.
- Virtually all of the movement of the picking hand occurs at the wrist, either in an up and down, or hammering, motion, or in a side to side motion.
- Choose whether to use your index or middle finger as your primary striking finger based on what feels most comfortable.
- The hammering motion is the one you’ll use to strike individual strings, the side to side motion is the one you’ll use to strum across multiple strings.
- Practice the two exercises and get comfortable with them before moving to video 2.
Step 2: The Thumb Rest
Welcome to the second lesson in the eight steps to clawhammer banjo video series. In the first lesson in this series, I introduced you to the basic clawhammer motion of the picking hand, which is the signature feature of this style of playing. And perhaps the single most important thing for you to do when you’re playing this style of music is to make sure you that you always keep that clawhammer motion going.
In this lesson, I’m going to share with you what I think is the secret to making sure you’re always able to do just that.
Let’s briefly review what I covered in the first lesson in this series. In that lesson, I mentioned that most of the movement that you’ll be making with your picking hand in clawhammer banjo is going to be at your wrist. And the main movement is an up and down, or knocking motion. That’s what you’ll be using to strike the individual strings like this.
The second movement you’ll make is a side to side movement of the wrist, which is what you use to strum across multiple strings. Hopefully you’ve been practicing both of those and you’ve gotten reasonably comfortable with them and are ready to move on to this lesson.
THE THUMB REST
So in today’s lesson I’m going to be covering what I refer to as the thumb rest.
One of the signature features of the five string banjo is the short fifth string itself, and most of the time in five string banjo playing, that fifth string functions as a drone note. A drone note is simply a note that is continuously sounded in the background in a piece of music.
I mentioned earlier that it’s important to always keeping our clawhammer motion going with our picking hand, but, in addition, we also need to make sure we’re always keeping this fifth string ringing as well. So how do we accomplish both those tasks? With the thumb rest, that’s how.
So what’s the thumb rest? Each time you make the clawhammer motion with your wrist, whether it’s the up and down hammer motion, or the side to side strum, the flesh of your thumb comes to rest against the fifth string at the end of that movement. The easiest way to make sure you do this is to keep the thumb extended as you play.
Here’s how your hand should look at the end of the initial clawhammer movement. Again, notice that the flesh of the thumb is pressed against the fifth string:
As I said earlier, I think the thumb rest is really the key to making sure you maintain a continuous and fluid motion with your picking hand. It’s the glue that maintains the clawhammer stroke as an efficient and compact, two-step, motion.
What often happens to beginners is they inadvertently break up the motion into three steps. They’ll strike with picking finger, and then they’ll try to find the fifth string with the thumb, and then move back to the starting position.
This ends up making it hard for them to develop speed, and hard to maintain a steady rhythm throughout their playing. As I’ve said, keeping a steady rhythm is vital to the sound of clawhammer banjo. And I think it’s this inadvertent failure to develop or learn the thumb rest that probably serves as the biggest impediment most folks face when learning clawhammer banjo. Fortunately, that’s not going to happen to you!
PREPARING FOR LESSON 3
So what I want you to do before the next lesson is to practice the thumb rest with both movements of the picking hand, making sure that the flesh of your thumb comes pressed up against the fifth string at the end of each movement. Once you get a little bit comfortable doing that, I want you to practice both of these along with the metronome.
For these exercises, I want you to play one clawhammer stroke for every two clicks of the metronome, like this:
I’ve created a playlist for you (click to access) that has metronome clicks at different settings. And what I’d recommend you do as you’re practicing the thumb rest is to start with the slowest metronome setting I have on there, which is 80 BPM, and practice both the hammer and the strum along with that one.
As you get comfortable with it, move to the next fastest one, which would be 90 BPM, and continue to do that until you are able to play comfortably and in time using both the hammer and the strum at the 140 BPM metronome setting. Once you’re able to do that, you’re all set for the third lesson.
BUILDING THE FOUNDATION
I understand that playing along with the metronome like this may seem a little bit tedious, but as I mentioned before, I think that getting the thumb rest right is one of the most critical pieces early on when you’re learning this style. And I also said in the introductory video that a little bit of patience in the beginning as you’re learning clawhammer banjo is really going to pay off in the long run, which it most certainly will.
So practice the exercises that I’ve covered here. If you have any questions or comments, please leave them in the video comments section. Otherwise, I’ll see you in lesson three.
Key Points from Video Two
- A smooth and steady clawhammer picking motion is critical for building speed and a solid rhythm
- The thumb rest, where the flesh of the thumb comes to rest against the fifth string at the end of the striking motion, is the key to keeping the clawhammer stroke efficient and compact.
- Practice the thumb rest with the hammer and the strumming motion, first on their own, then along with the metronome.
- Once you’re able to perform both motions comfortably and in time with the metronome, you’re ready for video 3!
Step 3: Striking Single Strings
Welcome to the third installment in the eight essential steps to clawhammer banjo video series. To recap where we’ve come from so far, in the first lesson, I discussed with you the two primary motions of the picking hand, which are the up and down hammer motion and the side to side strum.
In the next lesson, I introduced you to the concept of the thumb rest, which is that at the conclusion of either of those motions, the thumb should come to rest pressed up against the fifth string.
Hopefully you’ve practiced the exercises from both of those videos, and are all set to proceed with this lesson. As always, if you have any questions or comments regarding the materials as you work through them, please feel free to leave that in the comments section of the video, and I’ll be happy to answer any questions you have.
3 GOALS
So in today’s lesson, we’re going to work on striking the individual strings with our picking finger. And we have three main goals to accomplish when learning this particular skill. We want to be able to:
1) Pick each string cleanly
2) Pick each string without looking at our hand.
3) Modulate the amount of force we use when we strike the string, which will allow us to vary the volume of our playing.
Now, as you begin to work on the skill of striking single strings with your picking finger, you’re undoubtedly going to be inaccurate at first. You’ll miss the strings, you’ll hit the wrong one, you’ll hit multiple when you’re trying to hit one. This happens to everybody when they first get started.
In fact, it’s a bizarre idea to begin with to think that we’d be able to cleanly strike the single strings of the banjo just by moving our hand up and down. But, such a thing is indeed possible just with a little bit of dedicated practice.
FRUSTRATION-FREE FRAILING
So don’t get frustrated. Remember that most of the changes that occur in the brain to support any new skill are going to happen when you’re sleeping anyhow, based on what you’ve done the day prior. So, the real goal of a practice session is not to improve right then and there, but rather to give your brain the signal that you’d like it to change, and to tell it the way in which you’d like it to change – i.e. the skill that you want it to learn.
So, if you put in a little bit of focused effort day in and day out, each day you’ll wake up a little bit better, and I think you’ll probably surprise yourself at how quickly you’re able to learn something that at first may seem impossible.
To begin with, just try striking each individual string by itself – the first string, second string, third string, and fourth string – with your picking finger. Almost certainly, you’re going to find that striking the first string is the easiest, simply because it only has one string next to it. And as you work on striking each individual string, there are a couple of things that I’d like for you to keep in mind.
1) Start out with a very light touch, and then gradually increase the amount of force you give to the string. As I said in an earlier video, you’ll probably be surprised at just how little effort it takes to get a sound out of the string. If you’re able to develop a light touch from the beginning it’s going to make your life a lot easier down the road, particularly as you try to develop speed, and it also will allow you to vary the volume in the playing of any given tune.
2) As you get a little comfortable with this technique, start experimenting some with not looking at your picking finger when you play. Remember, ultimately we want to be able to strike the strings with our picking hand without having to look at it at all. It may seem somewhat counterintuitive, but you’ll actually be able to develop accuracy more easily and more quickly if you don’t look at your hand than you will if you do. You don’t have to do this right away; however, over time as you get a little comfortable with it, start playing out around with not looking at your hand as you’re trying to strike the individual strings, until you ultimately reach the point where you no longer have to at all.
It turns out that your brain is actually quite good at monitoring the position of your body, including the position of your hands, without any visual feedback whatsoever.
And, in fact, these “body to brain” feedback loops operate a lot faster than the vision to brain loops do, which means they’re a lot better suited to playing a musical instrument. It’s no coincidence that some of the best musicians we’ve ever known have lost their sight, and have had no choice but to use these better suited “body to brain” networks to develop their playing.
The other thing that not looking helps with is in getting you in the habit of using your ears as your primary means of feedback, as opposed to your eyes. We’re playing music, so we really want to judge how we’re doing by what we hear, and not by what we see. And so starting to do this early on is a great habit to get into.
So go ahead and practice a bit trying to strike each of the individual strings with your picking hand using the hammer motion. And don’t forget about the thumb rest – make sure that the flesh of the thumb ends up pressed against the fifth string at the end of the stroke. Practice doing this for a bit, and once you feel a little bit comfortable with it, we’ll move to a few more exercises with the metronome.
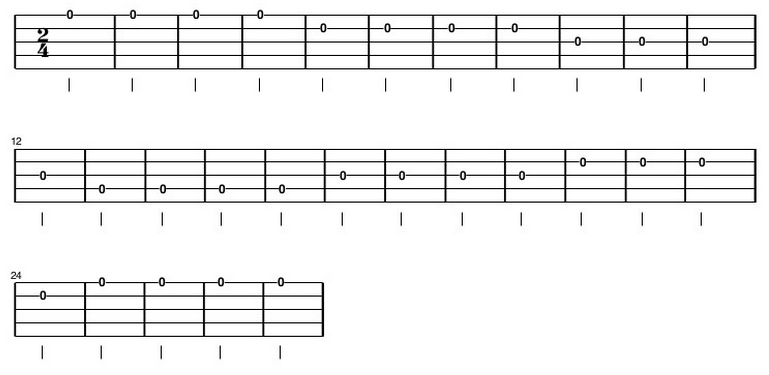
EXERCISE ONE
In this exercise we’ll strike each string four times, starting with the first string, progressing up towards the fourth string, and then back down towards the first string. And I once again recommend playing this along with the metronome or time keeping device of some kind (like Beats for Banjo).
For these exercises, start with the lower metronome setting of 80 BPM, and then as you get comfortable playing along with that continue to move up by 10 BPMs until you can play comfortably at around the 100 or 110 BPM setting. I don’t think you need to be able to play these any faster than that to get to where you need to be at this point.
Here’s the first exercise in tablature. Once again, play one stroke for every two clicks of the metronome:
EXERCISE TWO
For the second exercise, we’re going to strike each individual string one time, starting with the first, and then moving back up to the fourth, and then back down to the first:
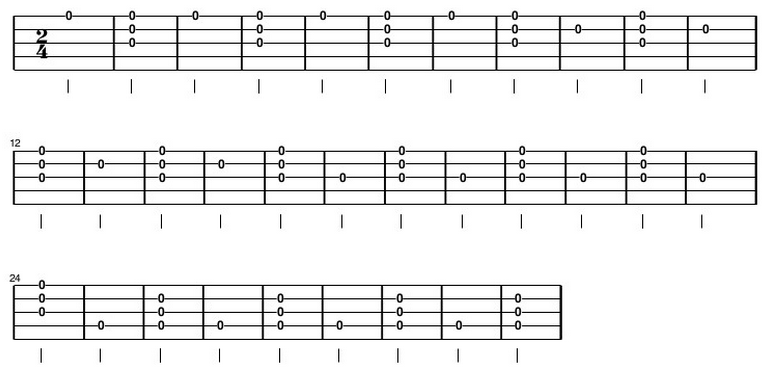
EXERCISE THREE
For the third exercise, we’re going to follow a pattern similar to exercise one, but instead after each hammer we’re going to throw in a strum:
EXERCISE FOUR
For the last exercise, we’ll use a pattern similar to the second exercise, but once again insert a strum after every hammer:
So that should be enough to keep you busy until the next installment. As I said earlier, this is will feel awkward at first. But if you stay the course, put in about twenty to thirty minutes a day of focused practice time, bit by bit you’ll undoubtedly get better each day. And in doing so you’ll be forming some great habits that, rather than limiting what you can do, will ultimately allow you to reach your fullest musical potential.
And once you’ve made your way through the exercises, you’re all set to move on lesson 4, where we’ll finally start putting the fifth string into action!
Step 4: Ringing the Fifth
Welcome to the fourth installment in the eight essential steps to clawhammer banjo video series. For many of you, this lesson is the moment you’ve been waiting for. Finally, we’re gonna start ringing the fifth string with our thumbs.
In many ways, we’ve building to this moment with the previous lessons, which have set the stage for us to learn this all important technique of clawhammer banjo playing.
DOUBLE DUTY
If you recall back in lesson 2, I mentioned that, for the most part, the short fifth string functions as a drone note in clawhammer banjo playing, meaning that it’s a note that’s continuously sounded in the background. Yet, in order for us to continuously ring a drone note, our picking hand must engage in two simultaneous tasks.
On the one hand, we have to pick out the melody note on the first through the fourth strings with our picking finger. And on the other hand, we have to keep ringing the fifth string with our thumb. As such, it’s critical that we develop a stroke that’s as efficient as possible, which is what we’ll end up with at the end of this lesson.
To recap what we’ve covered so far, in the first leeson we reviewed the two basic motions of the picking hand, which are the hammer and the strum. In the second lesson, we learned the all important thumb rest. And, in the last lesson, we covered the skill of striking the individual strings with our picking finger.
In this lesson, we’re going to cover the final piece of the clawhammer stroke: plucking the fifth string with the thumb.
PLUCKING AROUND
Before you start picking the fifth string with your thumb in the context of the clawhammer stroke, first just practice plucking the fifth string with your thumb on its own. Press the pad of your thumb up against the fifth string and press forward until your thumb rolls off. Remember that your nail isn’t involved at all in sounding the string.
Practice plucking the fifth string a few times so you get the feel for it, and then move on to practicing it as part of the clawhammer stroke.
Now we’re going to do that same exact thing, except we’re going to do it at the end of the hammer motion. To do so, just strike down on the first string using the hammer motion, have the flesh of your thumb come to rest against the fifth like we’ve worked on, and then pluck the fifth string with your thumb like you just did. It should almost feel as if you’re squeezing the fifth string towards your palm as you pluck it.
AN ADDED BONUS
One of the neat things that happens here is that after you pluck the fifth, your hand is going to naturally recoil a little bit and come back towards the place where you started. So regardless of whether you decide to sound the fifth string or not after the thumb rest, your hand is basically doing the exact same thing. In essence, you’re able to sound the fifth string with your thumb as an added bonus with the stroke.
After practicing plucking the fifth string after the hammer stroke for a bit, try it with the strum. Strum across the strings, have the flesh of your thumb come to rest against the fifth, and then pluck the fifth again just as you’ve been doing.
Practice both of those strokes a little bit, and once you’ve got the basic idea of it, move on to the following exercises, which I’d recommend practicing along with the metronome. As always, I’d recommend that you start on a very slow metronome setting, and then work to faster speeds as you get comfortable with it.
THE EXERCISES
In the exercises in this video as demonstrated, I’m playing one stroke per click of the metronome. In the previous videos, however, we’ve been playing one stroke per two clicks. This means that an eighty beats per minute setting will a good bit faster to you than it did in the other videos. So I’ve added some slower settings on the metronome playlist which you can access here, and I’d recommend that you for these exercises you start around the fifty beats per minute mark, and then increase by ten beats per minute until you can play along with the eighty beats per minute setting.
SET ONE
In this first set of exercises, we’ll play a hammer stroke, and then follow that with a hammer + thumb stroke. Do this first on first string, which in tab looks like this:
Exercise 1.1
Now, repeat that same pattern on the second string, then the third string, then the fourth string, as shown below:
Exercise 1.2
Exercise 1.3
Exercise 1.4
SET TWO
For the next set of exercises we’re going to again play a hammer on the first string, and then follow that with a strum + thumb stroke, as shown below:
Exercise 2.1
Once again, repeat this same pattern on the second string, then the third string, then the fourth string, as shown below:
Exercise 2.2
Exercise 2.3
Exercise 2.4
SET THREE
For the next exercise, we’re going to use the same pattern that we did in the first set of exercises, but then we’ll move it sequentially up the strings. So we’re gonna start on the first string, play the hammer and hammer + thumb pattern four times, move to the second string, then the third string, then the fourth string. Here’s what it looks like in tab:
Exercise 3
SET FOUR
In the fourth exercise, we’re going to be using the same pattern we did in the second exercise, the hammer followed by a strum thumb, and again take that pattern and move it from the first string, to the second string, third string, fourth string, just like we did in the last exercise. Here’s what it looks like in tab:
Exercise 4
SET FIVE
For the last exercise what we’re going to do is follow every hammer stroke with a thumb, and we’re gonna start by doing that on the first string. Here’s what it looks like in tab:
Exercise 5.1
Once again just like in the first two sets of exercises, I’d recommend you do that same pattern on the second string, the third string, and the fourth string, like this:
Exercise 5.2
Exercise 5.3
Exercise 5.4
THE SKY IS THE LIMIT
Congratulations, if you’re able to make it through those exercises then you’ve mastered the fundamentals of the clawhammer stroke, and now possess a tool that you can use to make incredible sounding music. As I said earlier, from here on out most of our exercises are gonna be either parts of tunes or entire tunes, so we’re gonna start making some really good music in a hurry.
So practice up, and I’ll see you in lesson 5.
Welcome to the fifth installment in the 8 Essential Steps to Clawhammer Banjo course. Up until this point, we’ve been exclusively working on developing our picking hand, or the clawhammer stroke.
And that’s for good reason, because the clawhammer stroke is what gives this style of music its defining sound.
And if you’ve made your way through the first four videos, then you should have a firm grip on the fundamentals of the clawhammer stroke, which will serve you well from here on down the road in whatever you choose to do with this style.
That being said, I don’t want to give you the impression that the fretting hand is somehow less important in clawhammer banjo. In fact, I’d argue that the fretting hand is called upon to do more in clawhammer banjo than it is with your typical stringed instrument, and that’s largely because of the clawhammer stroke itself.
I’ve said before that one of the most important things to do when you’re playing clawhammer banjo is to make sure you’re always keeping that clawhammer motion going with your picking hand.
But always remaining in that set pattern introduces a constraint. There will be times when you’d like to play a note with your picking hand, but that doing so would require you deviate from the pattern (which we don’t want to do). So, the way you get those notes is oftentimes with the fretting hand.
As a result, the clawhammer banjo player has a toolbox of left hand techniques that are somewhat unique to this style of music. In the next sequence of videos in this series, we’re going to be covering basic fretting, as well as some of these more unique clawhammer banjo fretting hand techniques.
In this installment we’re going to first be covering the basics of fretting. If you’ve played a stringed instrument before, or if you’ve played other styles of banjo, then this will be a bit of review for you. But not to worry – in the next series of videos we’ll be covering some of the more advanced techniques that are more unique to the clawhammer style.
Also, we definitely won’t be neglecting the picking hand altogether. In fact, in this lesson we’ll be revisiting some of the picking patterns that we worked on in the last installment, but this time I’ll be demonstrating how those are used within the context of a tune.
Basic Fretting
So as most of you probably know, the way we play different notes on an individual strings is by pressing down on different frets. By doing so, we change the vibrating length of the string, producing a different frequency, which we hear as different notes. And, the further we go down the fretboard (toward the banjo head), the shorter we make the string, and the higher the note we hear.
And just so that you understand the naming conventions we use for the fret positions: the topmost fret (the first one down from the peghead) is referred to as the first fret, the one below that is the second, and so forth all the way down the fretboard. And if your fretting hand is moving towards the banjo head, then you’re said to be moving “up the neck.”
There are a few things to try to keep in mind as you begin working on fretting.
1) Use a light pressure when you fret. It’s common for beginners to try to press down really hard on the fingerboard, and it’s often a habit they have to unlearn later on. But, as I talked about with the picking hand, the more relaxed your hand and the lighter your pressure, the more nimble your fingers will be, the easier it will be to develop speed, and the less likely you will be to develop any problems with pain when you play. So try to fret with as light a touch as you can to get a good note.
2) Place your fretting finger as perpendicular to the fretboard as possible. The flatter your angle of attack (i.e. the closer your finger is to being parallel to the fretboard), the more likely you are to inadvertently mute one of the adjacent strings with the flesh of your finger, which you don’t want to do.
3) Push down the string as close to the fret as possible. You want your fretting finger pressing down just behind the fret. The further back you go from the fret, the harder you have to push to get a nice clean note. And the goal here is to be able to generate a nice crisp, clean note when we fret.
So if you’re completely new to fretting, first I would just recommend you play around with it a little bit. Work on fretting at different spots on the fingerboard, on different strings, primarily with your index, middle, and ring finger.
You may experience a little bit of discomfort at first until you start to develop calluses on your fingertips, and that’s normal. But keep in mind the three points above and work on trying to generate a nice clean, crisp note when you fret.
When you feel a little bit comfortable with fretting techniques, then go ahead and move to the following exercises.
Tune Exercises
The following exercises will serve both as practice for your basic fretting techniques, and will give you a chance to work on the picking patterns that you worked on in the last lesson within the context of a tune.
The tune we’ll be playing is “Skip to My Lou.” Why “Skip to My Lou?”
Number one, it’s a tune that’s hopefully familiar to most, if not all, of you. Which means you should know how the melody goes. It’s very important that, whenever you set about to learn a new piece of music, you first know how it’s supposed to sound, or how the melody goes, before you try to find the notes on your banjo.
That’s especially true right now while you’re also trying to think about and work on these other technical aspects of playing. You have enough to think about without having to figure out how the tune is supposed to go at the same time.
The other nice thing about “Skip to My Lou” is that it’s a fairly straightforward melody, and it lays out nicely on the banjo in standard G tuning.
Speaking of standard G (gDGBD), make sure your banjo is in that tuning before you go ahead and proceed with these exercises. You should have a D on the first string, a B on the second, a G on the third, a D on the fourth, and a G on the fifth string.
The Basic Melody
Before we get started with the exercises, I want to make sure that we all have the same basic melody of “Skip to My Lou” in our heads, and we know where those melody notes are on the banjo. Here it s in tablature (without any clawhammery stuff added to it):
I should mention here that when we’re fretting notes, we also want to be efficient with the movement of our picking hand. This means that, whenever possible, we want to keep our fretting hand in one spot, and use different fingers to fret different notes (rather than move our entire hand up and down the neck).
Exercise 1
For the first exercise, we’re going to be playing the same melody from above, but we’re going to be inserting a strum-thumb stroke after the melody notes. This is usually referred to as a “bum ditty” type of pattern (the “bum” referring to the note played by the fretting finger, and the “ditty” referring to the strum-thumb that follows):
Exercise 2
In the second exercise, we’re going to again play the same melody, but we’re going to be playing hammer-thumbs (instead of strum-thumbs) after the melody notes. This pattern makes for a sparser sounding arrangement than the one with the strum-thumbs:
Exercise 3
For the third exercise, we’re again going to be playing the same melody, but this time we’re adding a thumb stroke after every downstroke with our picking finger. This gives it somewhat of a stoccato, machine gun, type of sound, and is oftentimes referred to as a “ditty ditty” pattern:
Until We Meet Again
Continue to work on those three exercises, along with basic fretting practice, until the next video. And again I’d recommend, when possible, that you work on these exercises along with the metronome. You can use the metronome playlist on my youtube channel if need be. As always, start out with the slower settings and work your way up to faster ones as you get comfortable with it.
Once you’ve got those under your belt, you’re all set to move on to lesson six!
Welcome to the sixth installment in the 8 essential steps to clawhammer banjo course. In this lesson, we’ll be picking up where we left off in our last video by continuing our work on fretting techniques. Hopefully, you’ve made your way through the exercises from the last video and are comfortable with the basics of fretting a note.
As I mentioned in lesson five, the fretting hand in clawhammer banjo is oftentimes called upon to do more than it is on perhaps your average stringed instrument. Specifically, there are many circumstances where, instead of sounding a note with our picking finger, we’ll instead use one of the fingers of our fretting hand to do so.
And in the next two videos, we’ll be covering the two primary techniques for doing so. The one we’ll be covering in this video is the hammer on.
THE HAMMER ON
When we execute a hammer on with our fretting hand, what we’re essentially doing is taking a string that’s already vibrating (and sounding a note we can hear), and then fretting it while it’s still moving. In doing so, we produce a new note.
There are a couple of ways of executing the hammer on. The first is to hammer onto a string that we’ve just struck with our picking hand.
Hammering on the Same String
If you’ve played other stringed instruments, or if you’ve played fingerstyle banjo, then you’re probably familiar with the technique of hammering onto a string you’ve just struck.
For example, if I strike the open 4th string with my picking finger, and then hammer onto the 4th string at the second fret with the middle finger of my fretting hand, I’ve used my fretting finger to change that note from a D to an E.
So go ahead and give that a try on each of the strings. Try playing the open 4th and then, while the string is still sounding that note, fret the string at the 2nd fret with the middle finger of your fretting hand.
Then try doing the same on the 3rd string – play it open and then hammer onto the 2nd fret with your middle finger. Then try playing the open 2nd, and then hammer onto the 1st fret with your index finger. Then play the open first, hammering on again at the 2nd fret with your middle finger.
Practice those hammer ons for a bit until you’ve gotten the basic idea of it.
Hammering onto a Different String (alternate string hammer ons)
One of the cool things you can do with hammer ons, which works particularly well on the banjo, is to strike a note with your picking finger, and then hammer onto a different string with your fretting hand. This is often referred to as an “alternate string hammer on”.
For example, I can strike the open 2nd string with my picking finger and then hammer onto the 3rd string at the second fret. Once again, the string I’m hammering onto with my fretting hand is different than the one I just struck with my picking hand (though the technique is the same).
So now give this try. Try striking the open 2nd string, then hammer onto the 3rd string second fret. Then strike the open 3rd, and then hammer onto the 4th string second fret.
Once you’re comfortable with that, we’ll move on to a couple of exercises.
Exercise One
In this first exercise, we’re going to use a little picking pattern to practice these two hammer on techniques.
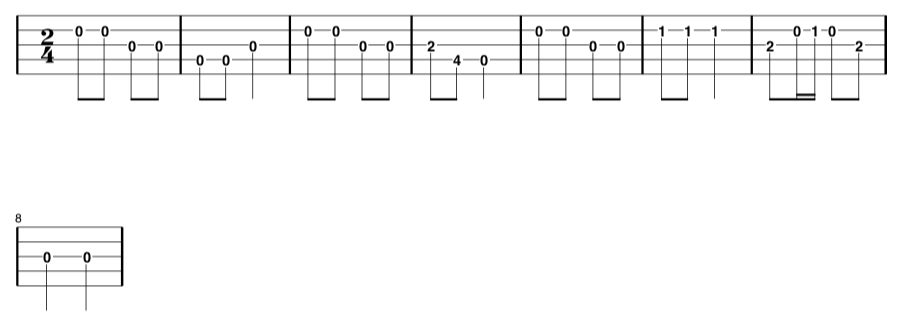
In tablature, a hammer on onto a string you’ve just struck is typically represented with an arc joining the two notes together, with a capital “H” over the top (standing for “hammer”). An alternate string hammer on, on the other hand, is represented by a number underneath the tablature, which refers to the finger of my fretting hand I usually use to execute the hammer on.
For example, in the fourth measure of the example below there’s a “2” underneath the tab. Here, I’m striking the open 2nd string with my picking finger, and then hammering onto the 3rd string (at the 2nd fret) with my 2nd finger (a.k.a my middle finger; 1=index, 2=middle, 3=ring, 4=pinky).
Exercise Two
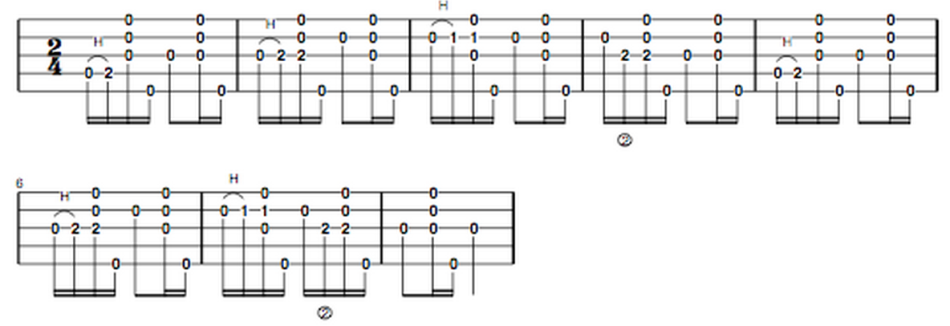
In this last exercise, we’ll be playing the A part of the tune “Turkey in the Straw.” It’s a very “notey” tune, and I’ve chosen it because it’s one of those tunes where the use of hammer ons allows us to play more melody notes than we would be able to if we were just to use the picking finger of our picking hand. So this exercise gives a nice illustration of what this technique allows you to do.
Here’s the tab:
Now, don’t worry if this one feels challenging at first. It’s supposed to. If you’re practicing it along with the metronome (click here for the metronome playlist), I’d suggest starting with perhaps the 40 bpm setting and then slowly working your way up from there. And, most importantly, have fun with it!
See you in lesson 7!
Welcome to the seventh installment in the 8 essential steps to clawhammer banjo video series. In this lesson, we’ll be continuing to work on those fretting hand techniques that allow us to steal extran notes from the banjo without breaking the clawhammer motion. Last time it was the hammer on, this time…the pull off.
THE PULL OFF
The pull off is one of those techniques where it can be easy for folks to get into a bad habit, usually because they’ve gotten the wrong idea about what they should be doing with their fretting hand/finger to execute the technique.
I think this could’ve been largely avoided if we could just go back and rename this a “pluck off”, because in my mind that’s the best way to think about it. What you’re really doing here is plucking the string with your fretting finger – instead of your picking finger – to play a note.
So, before you go any further, go ahead and just try plucking the first string with the index finger of your fretting hand. Try to do it so you get a clear note that rings out. Then try that same thing using your middle and ring finger.
Plucking Off on the Same String
Now, just as we did with the hammer on, the first thing we’re going to learn is pulling off on a string we’ve just struck with our picking finger.
For example, if I fret the first string at the second fret with my middle finger, then strike that string with my fretting hand, and then pull off the string after I’ve struck it, what I’ve done here is used my fretting hand to change the note from an E to a D.
So now go ahead and practice pulling – or plucking – off the 1st string at the 2nd fret with your middle finger after you strike it with your picking finger.
Then try the same thing at the 1st fret of the 2nd string using your index for the pull off.
Then try a pull off on the 3rd string, 2nd fret with your middle finger.
And lastly, try pulling off the 4th string, 2nd fret with your middle finger. Do this until you feel like you’ve got the basic idea of it, then move on.
Pulling Off onto a Different String (alternate string pull offs)
Just as was the case with the hammer on, one of the cool things we can do with this technique is pull off a string other than the one we’ve just struck with our picking finger.
The technique here is the same as pulling off the same string in that we’re just plucking a string with a fretting finger – the only difference being we’re doing this on a string other than the one we just struck with our picking finger. And what this allows us to do is play another note without having to break the clawhammer motion.
One more important thing to note here is that it actually doesn’t matter where on the fretboard you pluck off the string. Regardless of whether you pull off up towards the peghead or way down by the banjo head, the note you play will be the same.
So go ahead and give that a try. Strike the second string open with your picking finger, then pull off the first string with your index after doing so. Give this pull off a try with your middle and ring finger as well.
You may ultimately find one finger feels more comfortable for these pull offs, and might become your “go to” finger for this technique in the future.
Exercise One
In this first exercise, we’re going to use a little picking pattern to work on these two pull off techniques. You’ll note here in the tab that, similar to the hammer on, a pull off is represented by an arc joining the string you strike with your picking finger to the note you pull off to with your fretting finger, with the letters “PO” over it to signify a pull off.
Alternate string pull offs are denoted by a number underneath the tab, which refers to the fretting hand finger I typically use to execute the pull off. So you’ll see there’s a “2” underneath the tab in measures 3 and 4, indicating that I’m pulling of the first string in each of those spots using my 2nd, or middle, finger.
The tuning for this exercise is standard G (gDGBD).
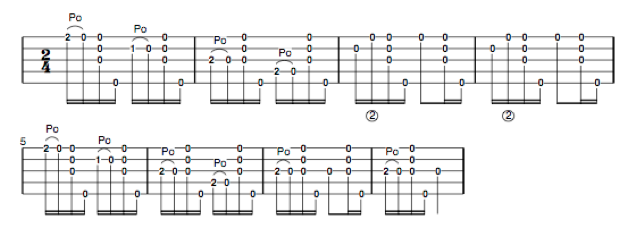
Once again, I’d encourage you to practice these exercises along with the metronome, and you can use the metronome playlist I’ve created if needed. Start out at the slowest setting and only move to faster speeds once you can comfortably play along with the one you’re on.
And though the exercise itself is just eight measures long, I’d encourage you to keep looping through it over and over as you practice it (I’d encourage doing this with all of the exercises).
Exercise Two
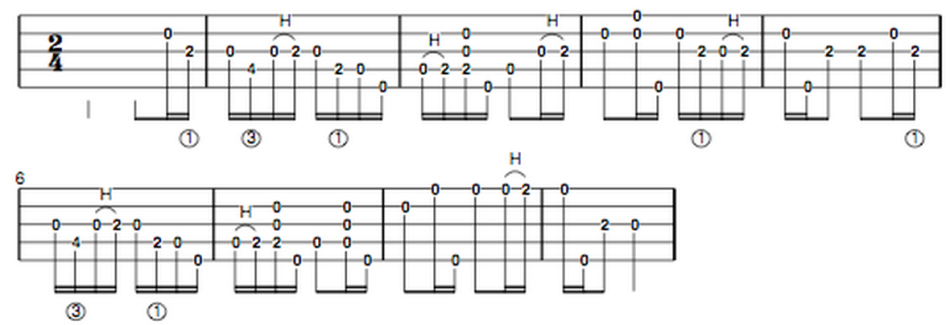
So in last week’s second exercise, we played the A part of the tune “Turkey in the Straw”. Naturally, I thought it fitting we conclude this video with the B part, which, as it turns out, also provides a good workout for our pull offs.
Just like the hammer ons did for the A part, the pull offs here allow us to get melody notes in this tune that we wouldn’t have otherwise been able to get without breaking our clawhammer motion. Once again, you may find this a little challenging right now, and that’s perfectly fine. Just use it as motivation to push yourself to get better.
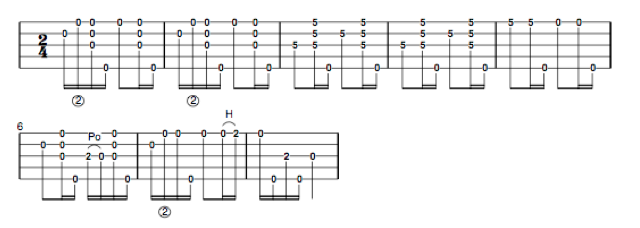
You’ll note in this tab in measures 3 and 4 that there are spots where the number “5” is on strings 1, 2, and 3. Here, you’re executing a brush stroke, and you do so while laying your index finger of your fretting hand across the strings at the fifth fret (so that you’re simultaneously fretting all 3 strings and the 5th fret). This is referred to as a “bar” position for the fretting hand (the finger is functioning as a “bar” over the strings).
JUST PLUCK IT
Okay, if my mathematical skills serve me right, we have only one lesson left in our 8 essential steps video series. And if you’ve made it to this point, congratulations, cause you’re developing all the fundamentals you need for a lifetime of great music, and your hard work and focus will ultimately pay off in a big way.
So, until next time, go pluck off!
Welcome to the eighth – and final – installment in the 8 essential steps to clawhammer banjo course. In this lesson, we’ll cover the last of what I consider the fundamental fretting hand techniques….the slide.
The slide is a common device used by clawhammer banjoists. As you’ll discover, it’s another great tool for adding another layer of interest to your music, and they’re not too difficult to learn!
Slides are also sound great on fretless banjos – and since fretless banjos have played a big part in the clawhammer tradition, it’s no suprise that slides do too.
THE TECHNIQUE
With the slide, as with the hammer on and pull off, you’re once again using your fretting hand to produce a new note.
In the case of the slide, as with those other two, you’re changing a note that was struck by your picking hand to a new note; however, in this case, you’re also sounding all the notes in between on your way there.
In my opinion, the slide allows you to better mimic what we oftentimes do with our voice when we move from one note to the next. We don’t typically move discreetly, but rather we tend to “slide” up from the first note to the second. I’ll cover this again in a bit.
So, to execute the slide, your start with the fretting finger on the starting note, then strike the string with your picking finger, then, while still holding the string down with your fretting finger, move to the new note.
Try doing this first on the 3rd string. Start by fretting it with your middle finger at the 2nd fret. Then strike the middle string with your middle finger, and after you’ve struck it, slide your fretting finger from the 2nd fret to the 4th fret (holding the string down with your fretting finger the entire time). This slide on the 3rd string from the 2nd to 4th fret is probably by far the one used most in clawhammer banjo.
After getting comfortable with that slide, trying sliding on the 4th string from the 4th to the 5th fret, again fretting with your middle finger. L
Lastly, try sliding on the 2nd string from the 2nd fret to the 3rd fret.
Once you’ve gotten a little comfortable with these, let’s try them in an exercise.
Exercise One
In this first exercise, we’re again going to use a little picking pattern to work on these slides we just reviewed. You’ll note here in the tab that slides are represented in the tab with a line joining the note you start the slide on with the note you end on, with the letters “Sl” over it.
The tuning for this exercise is standard G (gDGBD).
Once again, I’d encourage you to practice these exercises along with the metronome, and you can use the metronome playlist I’ve created if needed. Start out at the slowest setting and only move to faster speeds once you can comfortably play along with the one you’re on.
And though the exercise itself is just eight measures long, I’d encourage you to keep looping through it over and over as you practice it (I’d encourage doing this with all of the exercises).
Exercise Two
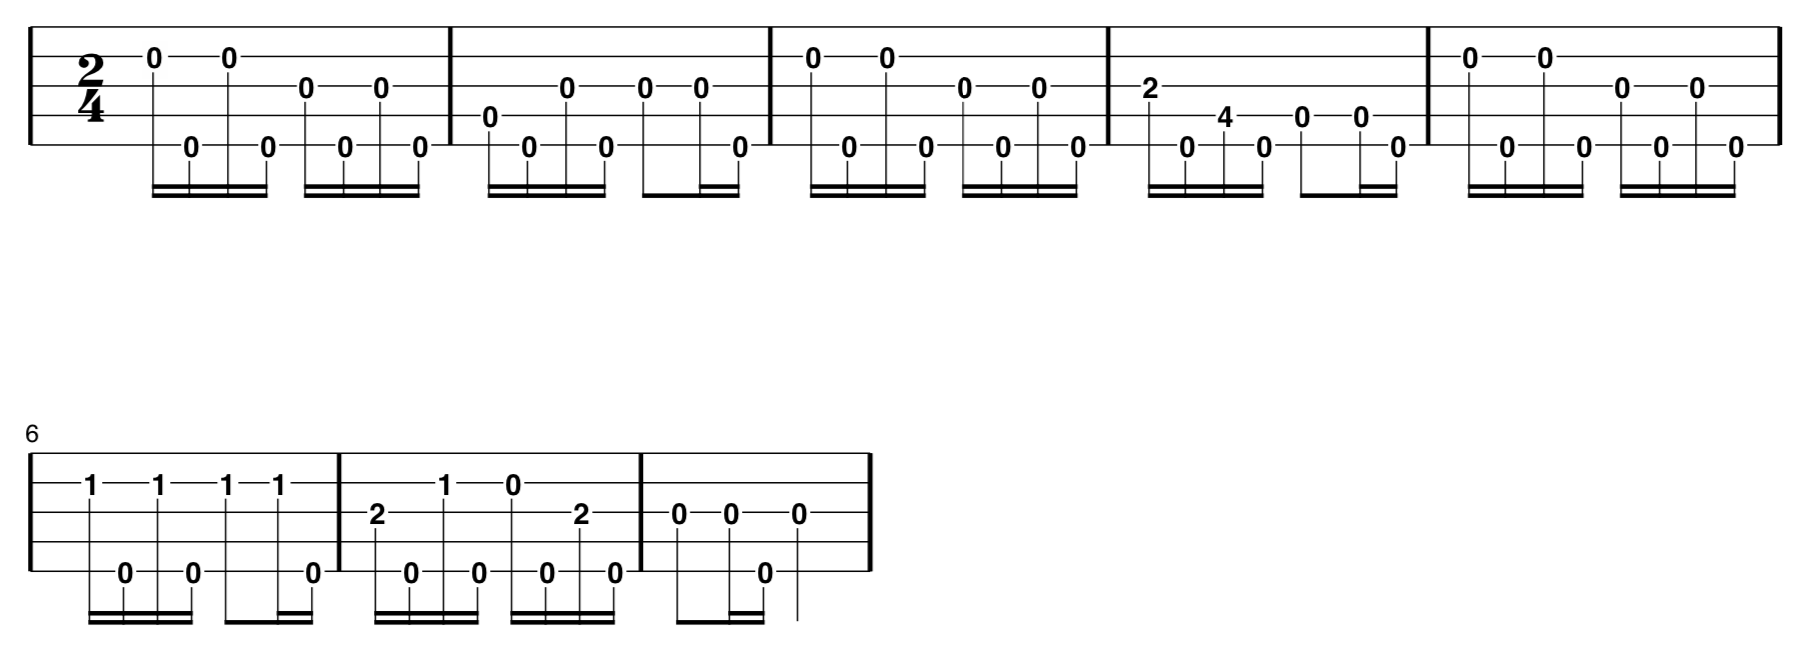
Now we’re gonna work on slides in the context of a tune, specifically the A part of the song “Bile Dem Cabbage Down”. Here, you’ll note that the slide on the 3rd string helps us to better capture how we’d sing this song with our voice.
Au Revoir…or not!
And, just like that, we’ve reach the end of our 8th and final lesson. If you’ve made through all the lessons this far, congratulations! Thanks to all your hard work, you now possess all the fundamental technical building blocks needed to make a lifetime of great music.
But this isn’t quite goodbye, as I’ll be coming back with a few follow up installments where we’ll work on learning some tunes, and in doing so demonstrate how these fundamental technical elements you’ve just learned can be combined in virtually infinite number of ways to create all manner of wonderful music.\
Welcome to the first bonus installment in the 8 essential steps to clawhammer banjo series. If you’ve completed the 8 steps series, then you now possess the fundamental technical building blocks needed to start creating all sorts of great music as a downpicking banjoist.
You know how to strike single strings, strum, sound the 5th, hammer on and pull off onto same and alternate strings, and slide. In other words, you’re poised and ready to unleash these skills out in the world in the service of great music.
But how?
Well, that’s what we’ll be talking about next. You see, the last thing I want is for you to finish the 8 steps and then fizzle out.
What I want to do next, then, is show you how to start putting your newly acquired skills to good use, and so I’m creating some additional content together to make sure you keep the momentum going.
In this video, we’re going to cover the basic rhythmic structure of clawhammer banjo, and I’m going to show you the ways in which we can combine the different technical elements we’ve learned together to create different sounds and rhythms.
After that, we’re gonna learn our first full tune: “Long Journey Home”.
CLAWHAMMER RHYTHMS
First off, let’s examine how we put together the components we’ve learned to create various rhythms in the clawhammer style.
As I’m sure you know, one of the defining things about clawahmmer banjo is its driving rhythm. It’s probably the thing that drew you into the style in the first place. So, let’s take a closer look at how we go about creating that driving sound
To do so, we’re gonna cover just a little bit of music theory. Not too much, though – just enough to deepen our understanding of the topic, and nothing more.
The Basic Structure
Most forms of music can be divided into a basic, repeating unit of rhythm, known as a measure. And most of the time when we’re playing clawhammer, we’re going to be playing in what’s known as 2:4 time.
For the purposes of this discussion, the only thing you really need to know is that the fundamental rhythmic unit of much of the music we play is in 2 beat chunks. So, in 2:4 time, each measure has 2 beats.
To count that out, we just say “1, 2, 1, 2..” When we talk about beats per minute when we’re measuring speed, this is what we’re referring to. These are the clicks of the metronome.
We can divide those measures even further, by splitting each beat into 2 parts. Now we’ve divided our measure into 4. And we count that out as “1 and 2 and 1 and 2 and”. In other words, we insert an “and” in between the clicks of the metronome:
We generally refer to the “1” and the “2” as the downbeat, and the “AND’s” as the upbeat. In clawhammer, we’re almost always going to be playing the downbeat and upbeat with our frailing finger.
Lastly, we can divide those 4 measures in half again, leaving us with eight equal divisions. This we count as “1 e and a 2 e and a”. The “e’s” and “a’s” we’ll refer to as the offbeat. And, in clawhammer, the offbeat is the domain of the thumb. Almost always, when we’re playing a note on the banjo with our thumb, it’s a note that falls on the offbeat.
So this is the fundamental structure of most clawhammer music, and how you choose to fill in that structure is really a matter of choice. This structure is always there, regardless of whether or not we sound each part on the banjo.
We have the option of filling in the structure with a hammer strike or a strum on the down and upbeats, and with a thumb pluck on the offbeats. Or we can choose to leave any of those beats silent. Ultimately, the rhythms that we create in clawhammer depend entirely on how we choose to fill in that structure.
Now, let’s cover the two most common rhythms used in clawhammer banjo.
The “Bum Ditty”
For this rhythm, we’ll strike a single string on the first downbeat. When our thumb then comes to rest against the 5th string, we’ll leave it silent. On the upbeat, we’ll strum. And when our thumb comes to rest against the 5th this time, we’ll sound the string. Then, we’ll repeat that same pattern in the second half of the measure.
Altogether, this creates a “bum ditty” rhythm, which is created by leaving that first and third offbeat (the “e” count) silent.
The “Bump-a-Ditty”
Now, let’s create a second rhythm, again starting with a hammer strike. This time, when the thumb comes to rest against the 5th on the 1st offbeat, we’re going to sound the 5th string. Then, on the upbeat, we’ll make a hammer strike again with our picking finger, and then follow again with a thumb on the offbeat.
We’ll repeat that same pattern for the second half of the measure. Now what we’ve ended up with is a “bump-a-ditty” rhythm, which we’ve created by filling each of our 8 slots with a note from the banjo.
These two patterns – “bum ditty” and “bump a ditty” – are found throughout clawhammer banjo music, and both create a different feel and rhythm to the music. Some players tend to stick to one primarily. Grandpa Jones, for example, leaned heavily on the “bum ditty” pattern. It works especially well for vocal accompaniment.
Banjo players from the Round Peak tradition – guys like Tommy Jarrell and Fred Cockerham – stuck more to the bump a ditty pattern. I personally will vary depending on the tune, and in some cases will vary what I do within the same tune. Overall, it’s just nice to have options so you can play what you like, and so you can keep things interesting.
You’ll notice here, too, that the main difference between these two rhythms as that in one you choose to sound the 5th string on the first offbeat, and in the other you don’t. In both cases, your thumb is pressed against it and ready. So, given the technical skills you now possess, being able to switch between these two patterns is a trivial matter.
A Starting Point
And although these two rhythms are the foundation of a lot of clawhammer banjo, this doesn’t mean you must use them all the time. As I said, we’re free to fill our fundamental rhythmic structure any way we wish; we can use one of these exclusively, move back and forth, or do something else entirely. It’s just a good idea to always have this backbone in mind when we’re playing, as it helps keep our rhythm solid.
As you start learning some of the tunes I’m going to teach you, try to be mindful of this underlying structure, as well as the ways in which we’re filling it. For this first tune, “Long Journey Home”, we’ll be leaning heavily on the “bum ditty” pattern.
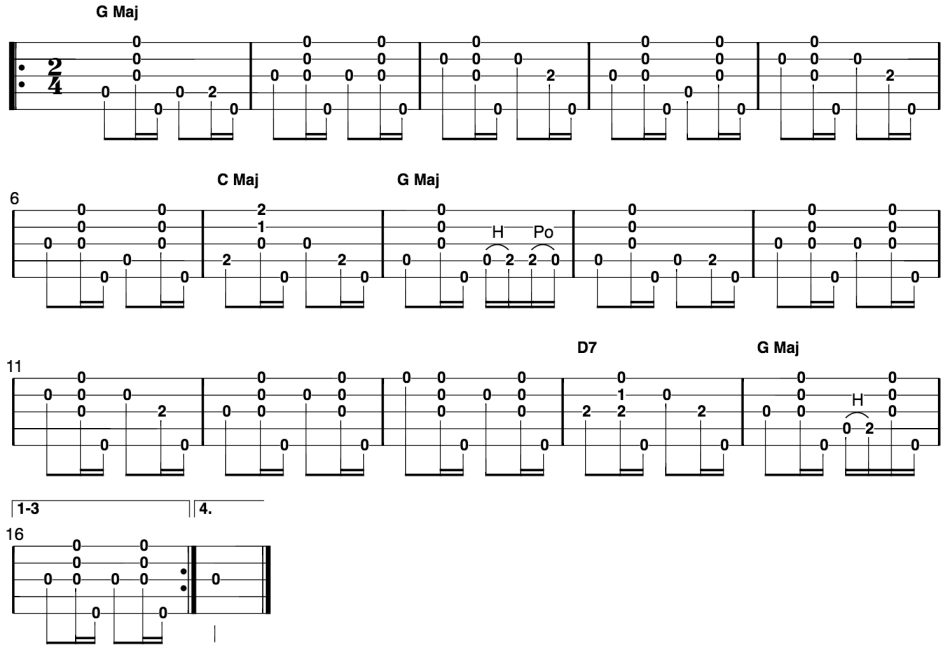
Long Journey Home
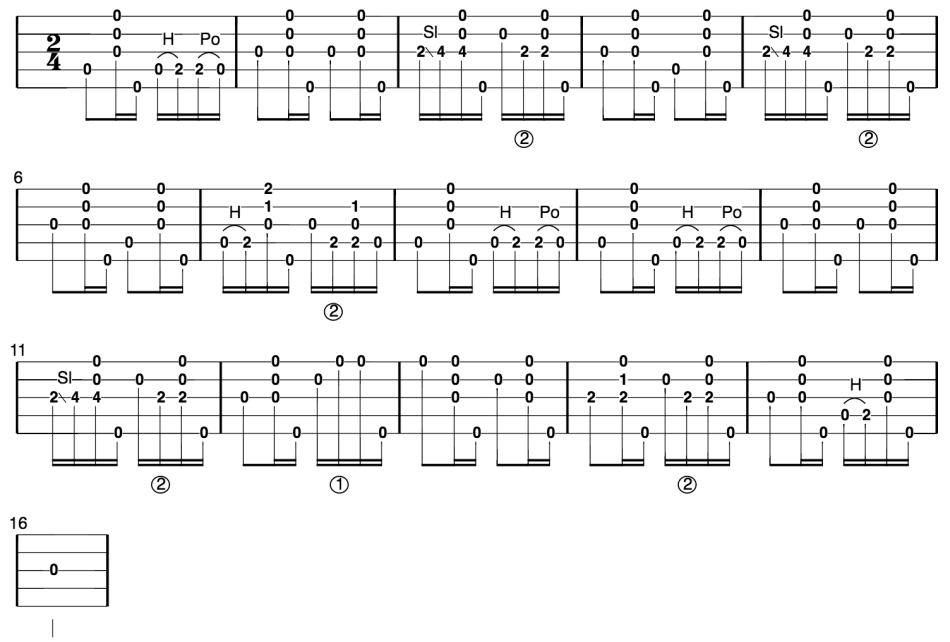
Level 1 Arrangement, gDGBD tuning
The tune we’re now going to learn is “Long Journey Home”, in the key of G. And we’re playing it out of gDBGD tuning. This first arrangement, which is the one I review in the video, is a “level 1” arrangement. This means that all the techniques you need to play it have been covered in the “8 steps” series, and is the easiest in terms of level of difficulty (this doesn’t mean it’s “easy”, nor does it mean it doesn’t sound great!).
Long Journey Home
Level 2 Arrangement
This next arrangement is a “level 2” arrangement. Level 2 arrangements also only draw upon techniques covered in the “8 steps” series, but should prove to be a bit more of a challenge than level 1 arrangements. And they also should sound great! So, once you feel a little comfortable with the level 1 arrangement, try your hand at the level 2.
There are a few alternate string hammer ons and pull offs in this arrangement. If you recall from the lesson on them, they are denoted by a number underneath the tablature, which refers to the finger I use to play the note (1 for index, 2 for middle, etc.). If the string is lower in pitch than the one before it, then you’ll play hammer on; if it is higher in pitch than the one before it, then you’ll play a pull off.
That’s Not All, Folks
I’ll be back soon with another bonus installment, where we’ll learn another tune, and I’ll share with you the foolproof approach I recommend for learning new tunes. I think you’ll really like it.
See you then!


